Zoom step by step

We chose to browse one of the most popular platforms, the Zoom platform. What makes this platform so popular is that it allows people from all over the world to be found easily.

Meetings with one or more people

You can get in touch with many people in front of their computer or mobile phone.

Screen sharing

Share your screen with many people and make a presentation.

Free to use package

Unlimited 40 minute appointments with the free version. Remove the time limit by upgrading the account.

Small requirements

It is a very light program and has good quality even in low internet connections.

A brief presentation of the program I like Zoom and others.


To be here, we assume that you already know the well-known Zoom application which is a remote meeting application. We will try to give you the basic picture of the operation of these programs by taking the example of training.

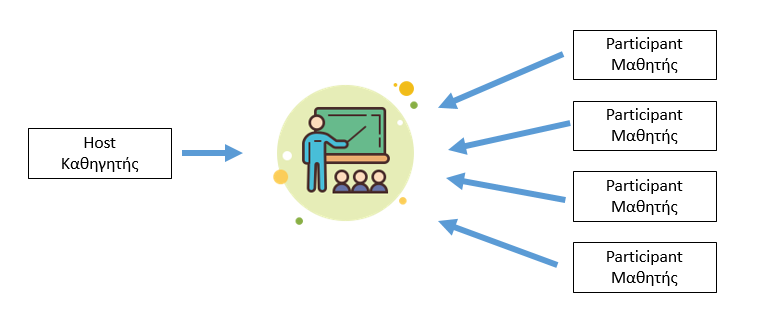
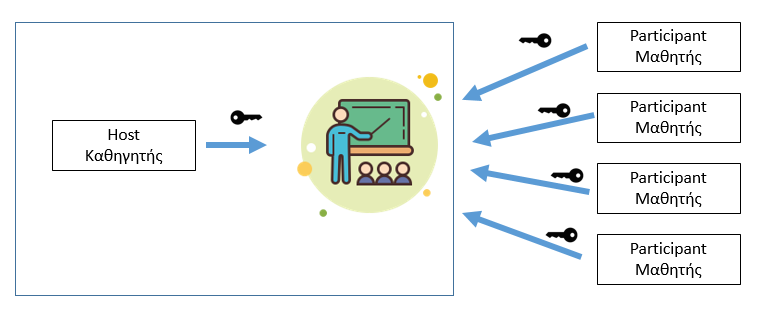
Suppose you are a teacher and you want to take a course through modern training. Through the Zoom platform you create a virtual room, which can be accessed at the same time by anyone who has access to it and wants to attend your lesson. 

The Host (the teacher) is the one who allows the access, to anyone interested, to the virtual room by providing him with a "key". This key is usually a code or a link and is, in essence, the address of that particular room. One needs a computer (landline or laptop) or mobile phone to attend the course. State-of-the-art mobile phones, like laptops, have built-in cameras and microphones. In the case of desktops, it is necessary to install a camera with a built-in microphone.
Let's imagine now that we are in the virtual room. The Host as a host-presenter, as the word "host" suggests, is responsible for the proper functioning of the site. This means that it can manage issues such as muteing the microphones of other participants, turning off the camera, etc.

Some online education / teaching products (including Zoom) allow participants who do not have a computer to participate in the telephone chat / presentation. In this case the participant does not have a picture of the room, nor is he visible to the other participants but can listen and speak if necessary.

In summary, the successful start of the presentation / teaching requires:
1) Preparation for the creation of the "room" by the Host
2) Sending invitations to potential participants for the meeting

Instructions for creating your first virtual room

Zoom step by step installation

At WebsiteGreece we chose to browse one of the most popular platforms, the Zoom platform. What makes this platform so popular is that it provides:
  • Very good audio and video quality of tele-meetings, with little use of the network
  • Free account with a limit of 40 minutes of use (for meetings of 3 people or more).
  • The ability to host up to 100 participants
  • The use of internet table and chat
  • Content sharing (screen share)
  • The ability to chat / comment in real time
  • The ability to attend previous meetings, at a time he wishes
  • Unlimited online meetings
  • Option for one-on-one meetings but also for larger groups
Step 1. Create Account

Go to tool address:https://zoom.us/ select the "sign up! It's free" field and create an account.
After entering your email, at the point indicated by the platform, you will click "send" and the following message will appear (in case you want to receive updates from the platform) press Confirm.
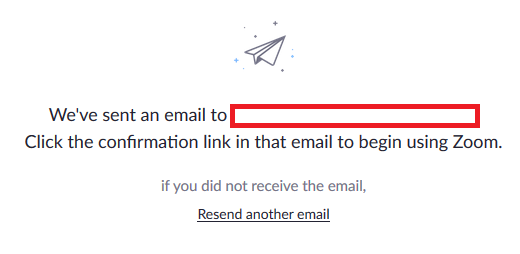
The following message will also appear on your screen informing you that a message has been sent to your email.
At this point you should check your email and click on the confirmation message (Activate account) you have received as shown below. After pressing this button, your account is activated and you can use the Zoom platform.
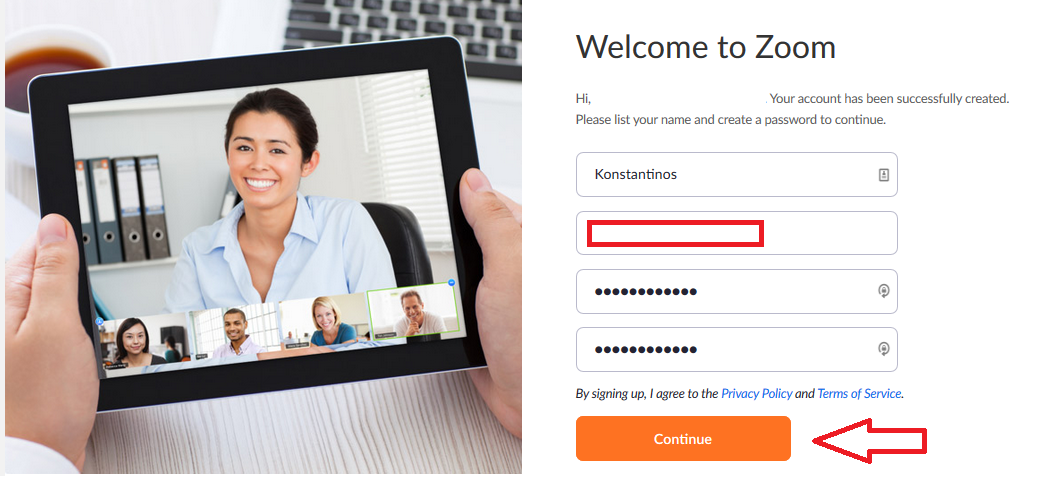
Once you have activated your account, you are asked to enter your name, email and a password, and click "Continue".
Attention, the password must:
• Have at least 8 characters
• Have at least 1 letter (a, b, c ...)
• Have at least 1 number (1, 2, 3 ...)
• Have uppercase and lowercase characters

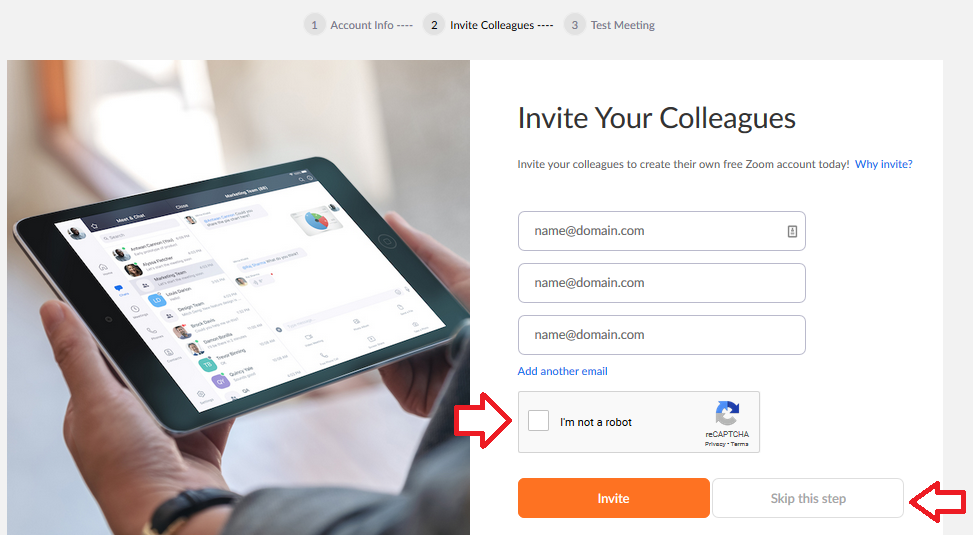
You are then asked to invite other colleagues. For now, you can skip this step by selecting the "I'm not a robot" field and then clicking "Skip this step".
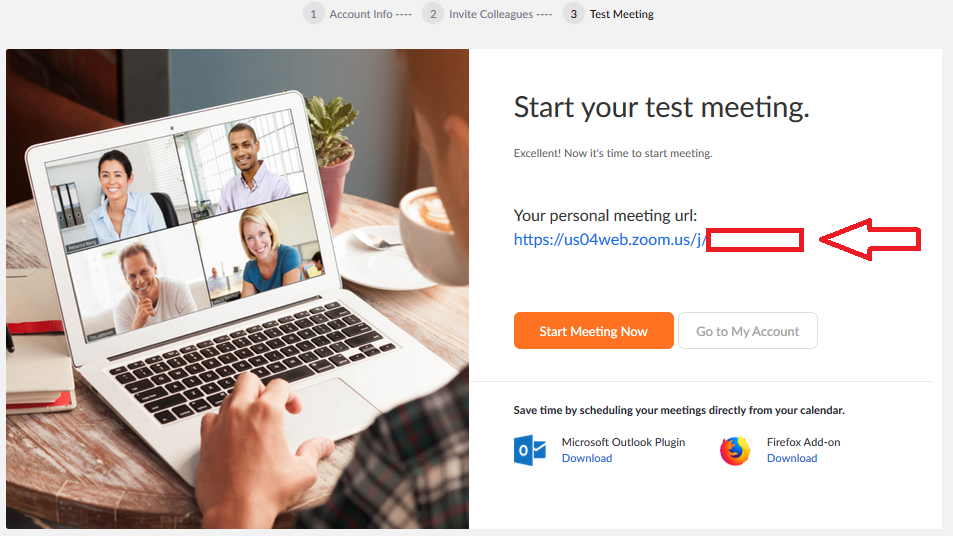
Congratulations! You have completed the process of creating your account. The link (your personal meeting url) that you will see above the "Start your test meeting" is the invitation / key, which you send to those who wish to participate in the online meeting.

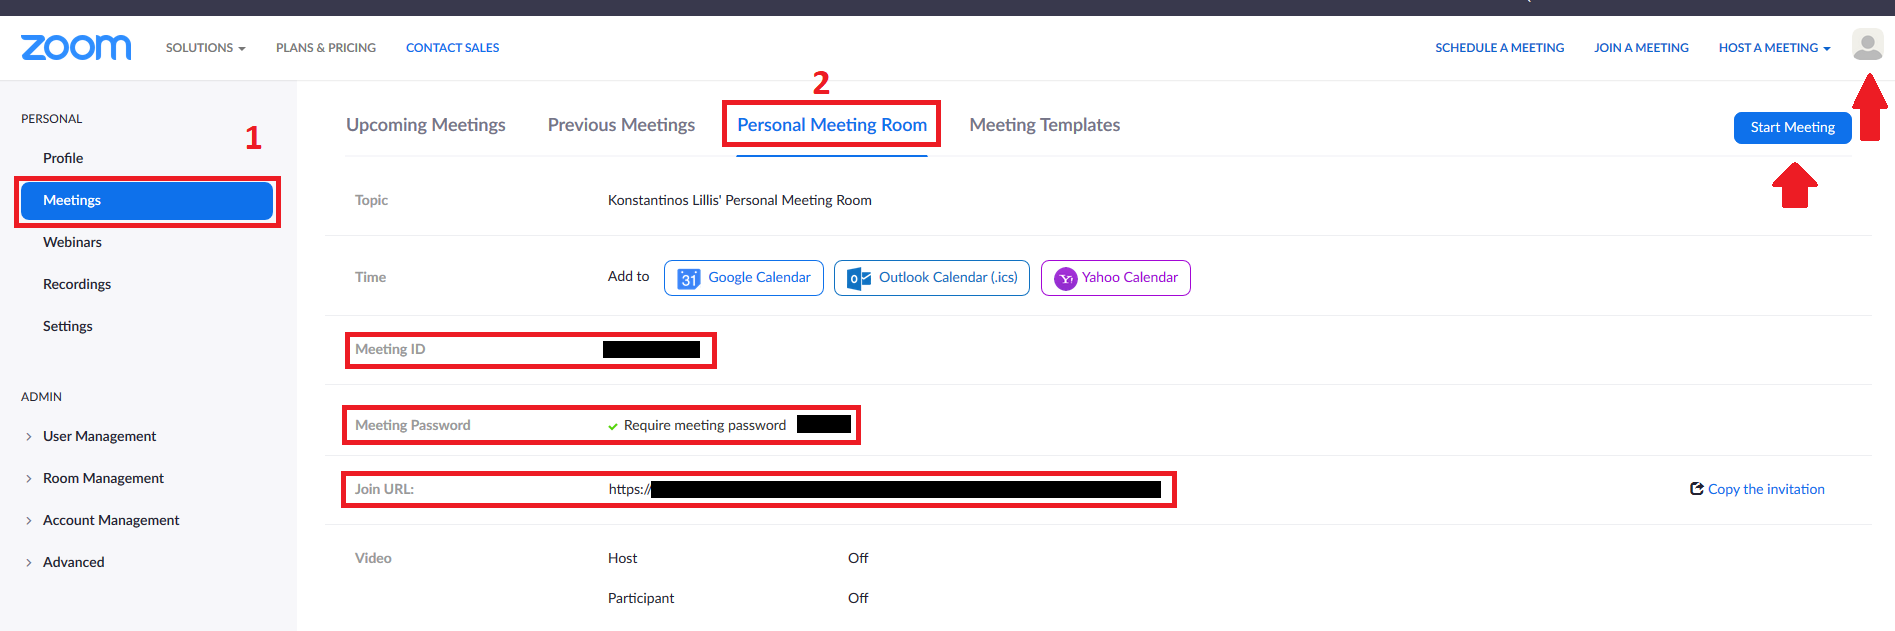
But let's put that aside for a moment to better prepare. Once you are logged in to your account, go to its settings by tapping the human icon at the top right of the screen. Then select Meetings (1) and then Personal Meeting Room (2).

There you will see the 3 most important elements of your room that we will explain immediately.
You will find the Join URL, which is the link one needs to connect from a computer.
You will find the Meeting ID and Meeting Password that are necessary to connect someone from a mobile phone.

Now, if you want to start the meeting at that time, tap Start Meeting on the right side of the screen.
Step 2. Entrance to the virtual room

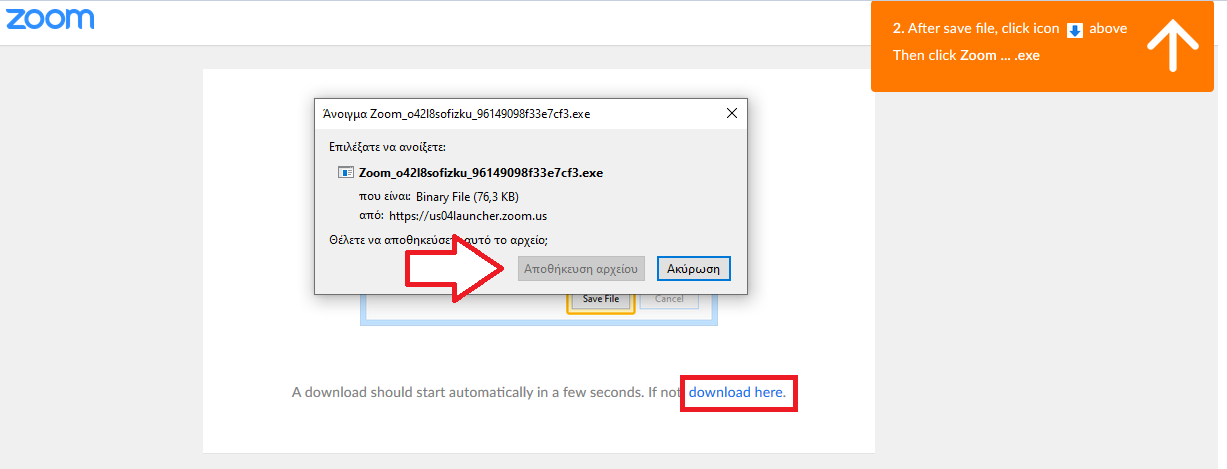
By clicking on the (Start Meeting) button, the following window appears on your screen allowing you to save the program and then install it. If the window does not appear, click Download Here at the bottom right.
After you "run" the following pop-up window will appear
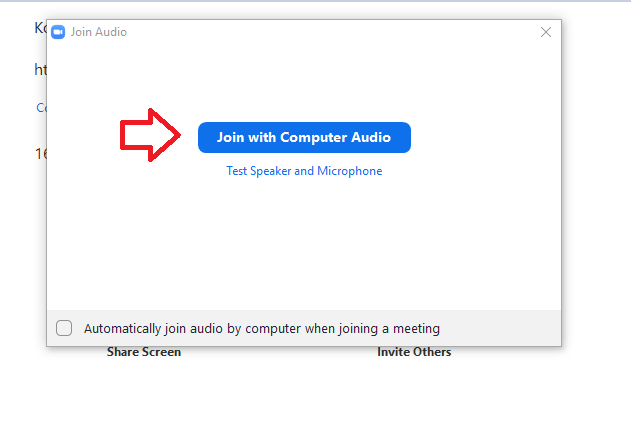
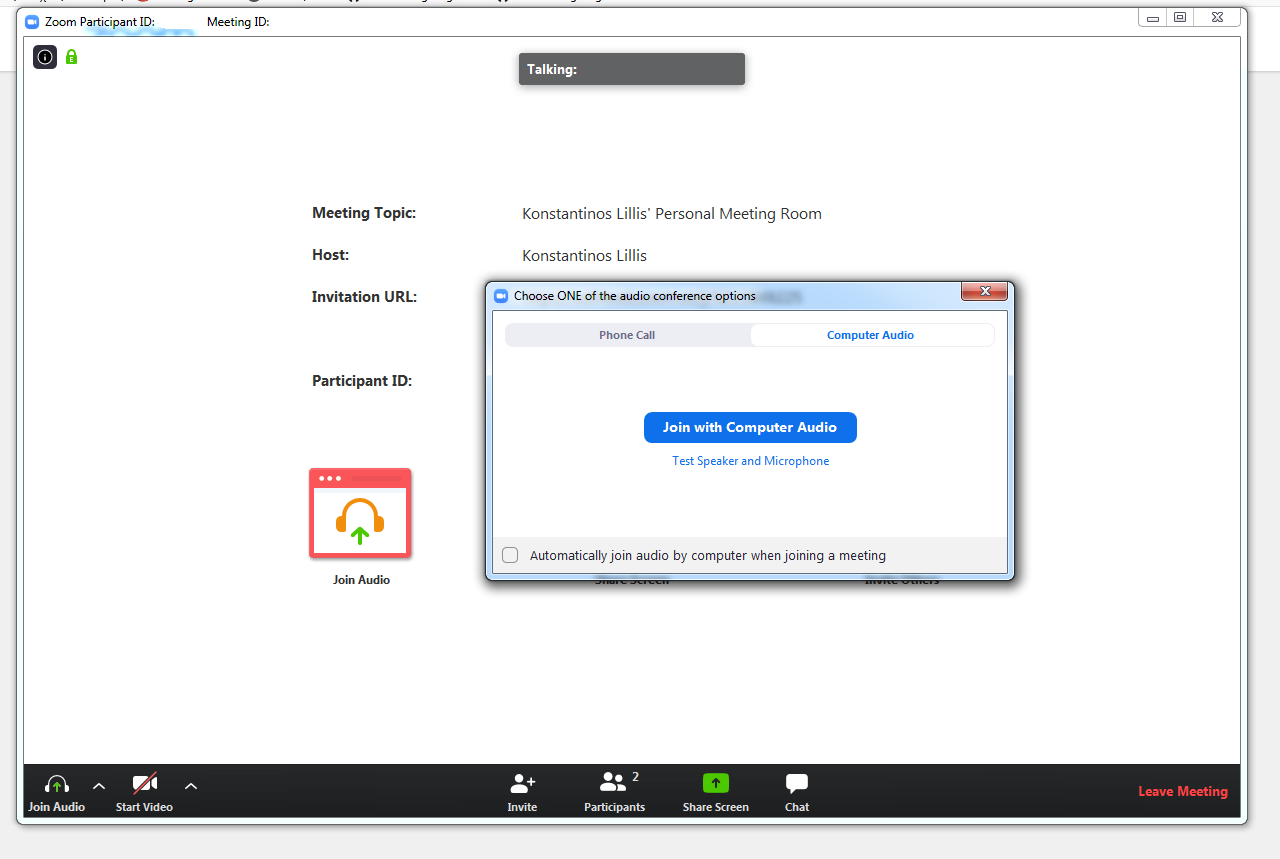
At this point you are given the option of using computer audio. You can choose to check that the computer speakers and microphone are working by selecting "Test Speaker and Microphone" and otherwise if you are sure that they are working properly, you are selecting that you want to use the computer sound.
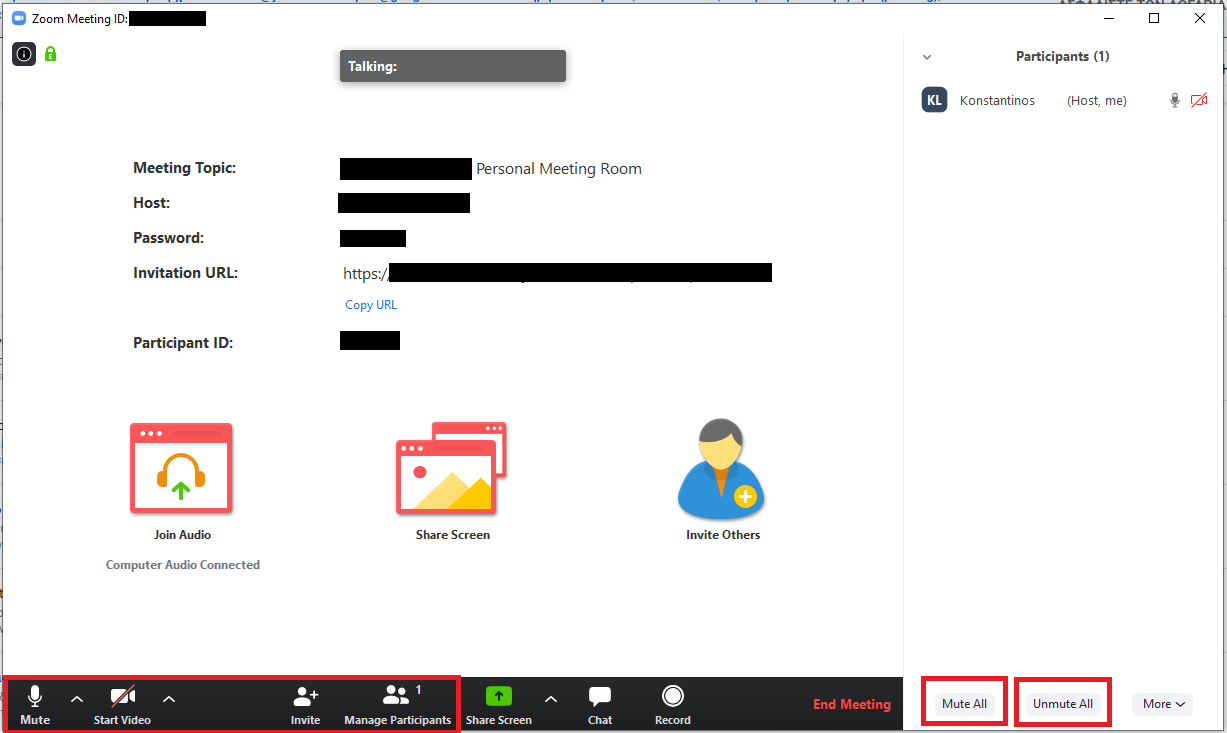
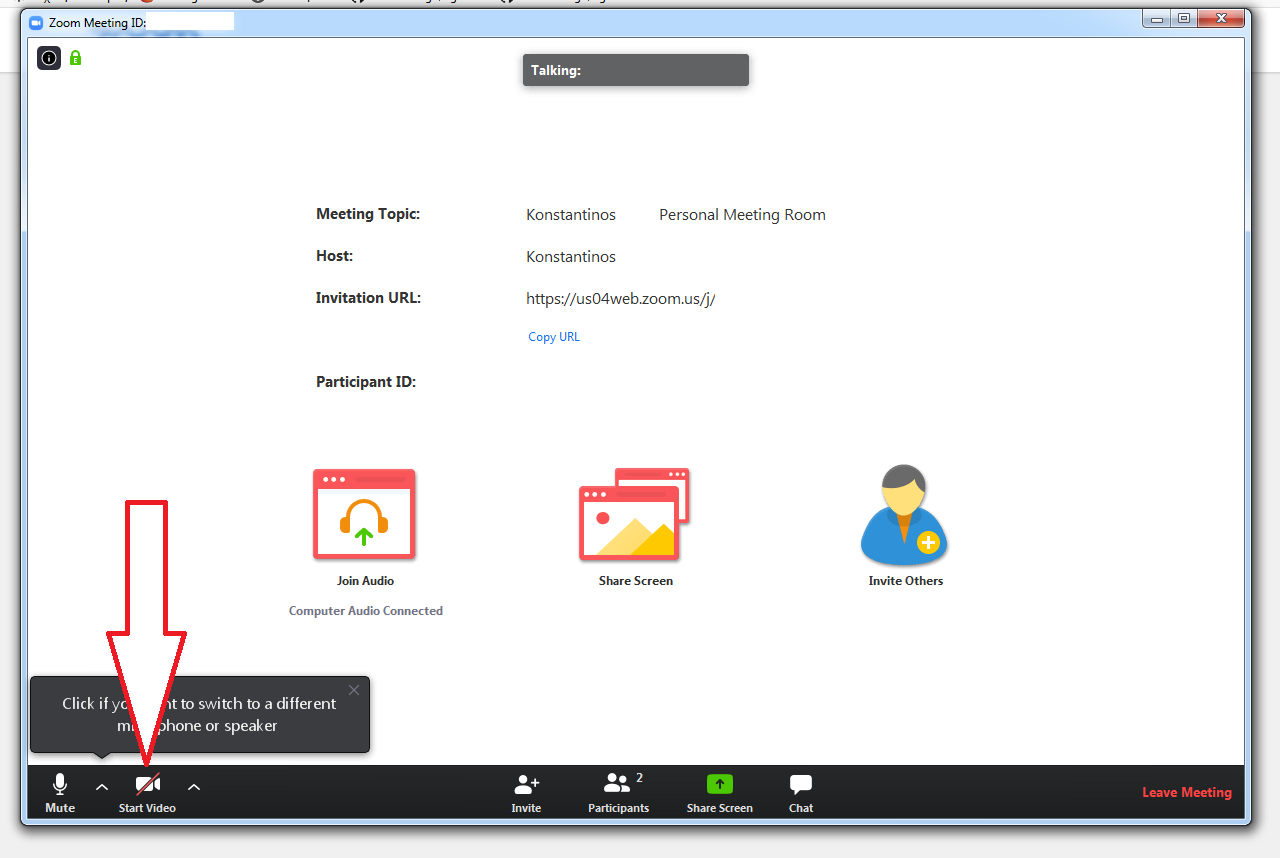
While you wait for the other participants to connect, the table above will appear on your screen. You will see at the bottom left of the screen, a microphone is on. If you do not want your own sound to be heard, you can tap on it and turn it off.

The camera is not turned on, if you want to turn it on, press on the camera and turn it on.

Clicking on "manage participants" on the right side of the screen will display the list of participants. You have the ability to turn the microphone on or off by a participant, but also to turn on or off a participant's camera. You can also select "Mute all" at the point on the screen where participants appear and turn off their microphones, so that the presentation can be held in complete silence. Right next to "Mute all" has the option to turn on all microphones "Unmute all".
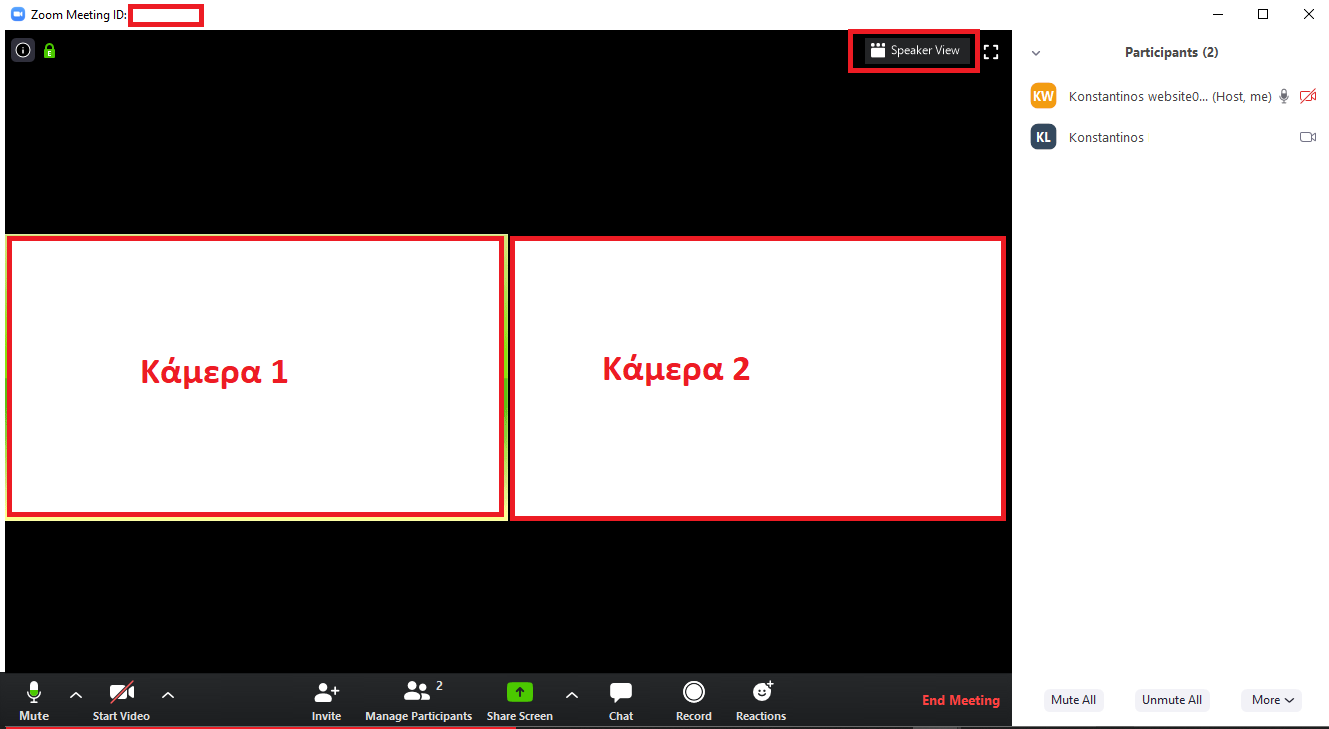
When someone logs in, their camera appears in a box. If you want to change the way the camera layout is displayed on your screen, tap on the top right of the screen where either Speaker View or Gallery View is displayed.

If you want to end the meeting then click End Meeting, bottom right.

Presenter entry instructions

Summary:

The next time you want to log in to the platform you should:

A) Log in to your Zoom account and
B) Open the link that leads to the room you have created.

This way the platform "realizes" that you are the administrator (Host) and not one of the trainees.

Analytically:

To log in as Host you must:
1) Login (sign in) to your account www.zoom.us where your account options will open as the next photo shows. From the left you will select Meetings (1), then Personal Meeting Room (2).
2) There you will find the Join URL, the Meeting ID and the Meeting Password. As we saw earlier, you give the Join URL to those who need to connect from a computer, you give the Meeting ID and the Meeting Password to those who will connect from a mobile phone.
3) Click on the Start Meeting on the right of the screen and enter your room!
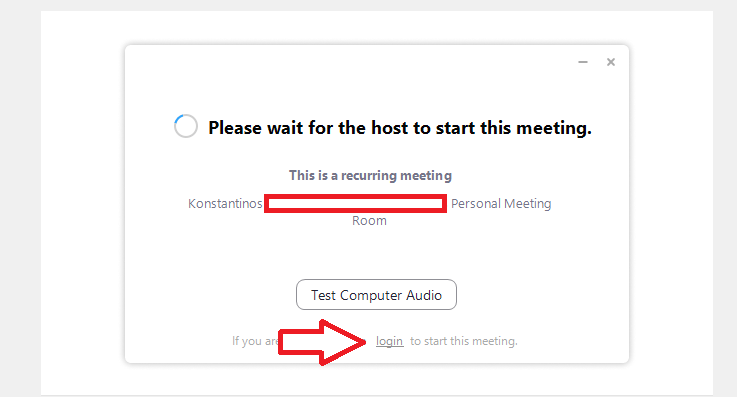
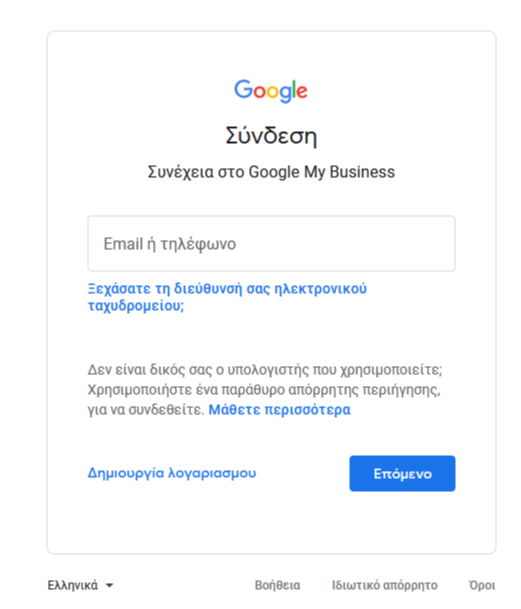
If for some reason you do not Login (sign in) to your account earlier and click on the link that you will give to the other participants, you will get the following message where you can Login from there with your email and password.

These instructions apply to the participants you invite to the teleconference.

Visitor login to watch

Instructions for connecting from a computer

Step 1ο

Open the link you received

You will open the link sent to you by the administrator and the following message will appear. You will save the program and install it (open the program when it is saved and follow the instructions).

Step 2ο

The connection is almost complete

In case the room is already "open" by the creator, you will see the image above that asks if you want to connect to the computer audio settings or try the speakers and the microphone. So click on "Join with Computer Audio" to connect. If you still can't hear or be heard in the meeting go to troubleshooting below.
 
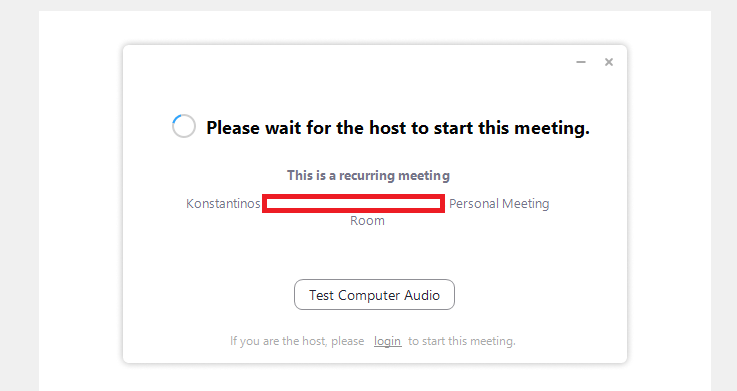
Alternatively if the creator is not logged in, the following message will be displayed and you will have to wait for the host to log in.

Wait until the administrator logs in.

Again here while you wait it suggests you to check the audio settings.

Camera!

Turn on the camera too!

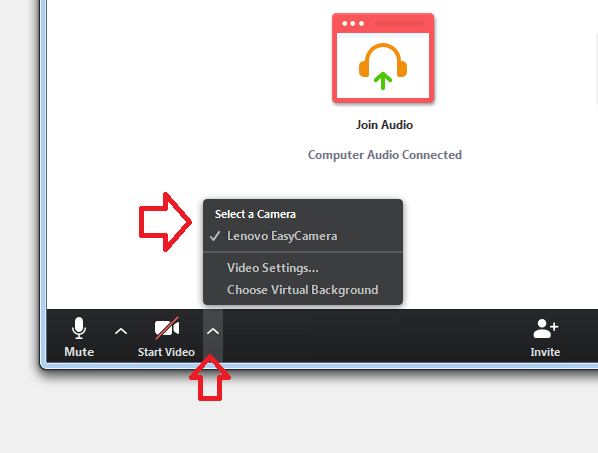
When you log in your microphone will be on (unless the administrator has muted it). To activate your camera, click on the icon as shown by the arrow.

Instructions for connecting from a mobile phone

Step 1

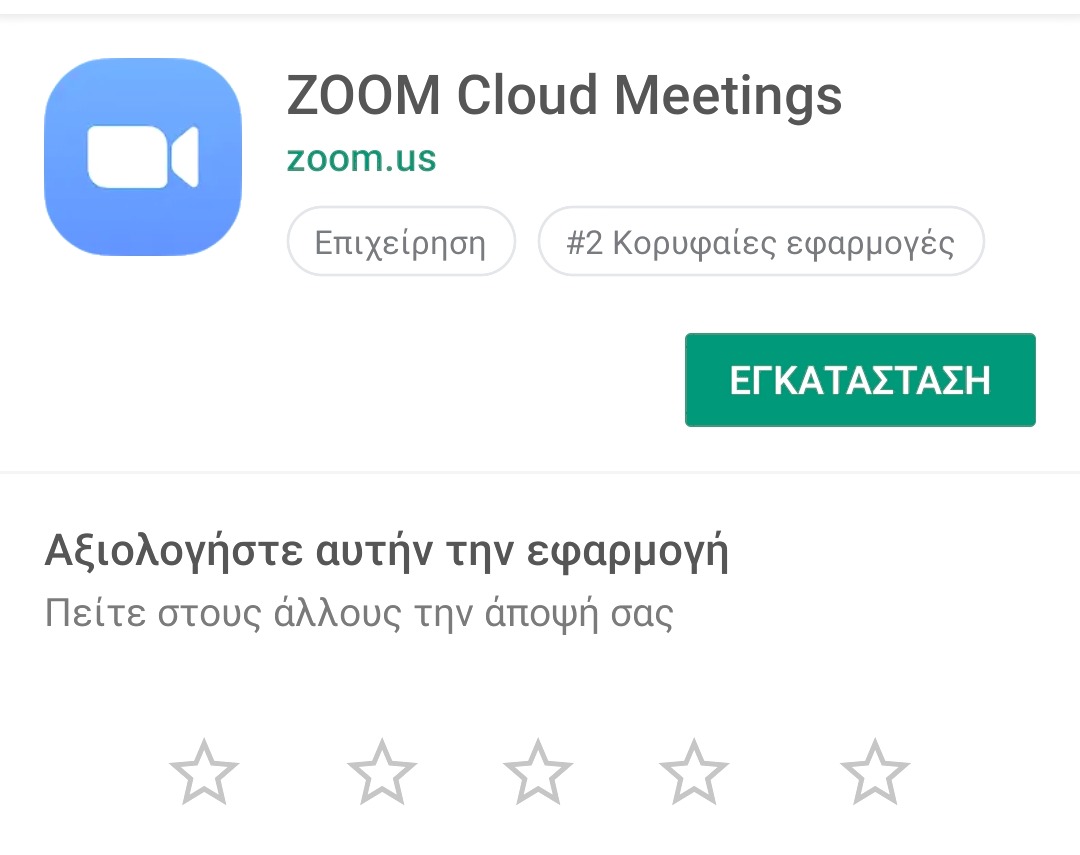
Install the "Zoom Cloud Meetings" application on your mobile phone

Εγκαταστήστε την εφαρμογή ZOOM Cloud Meetings στο κινητό σας είτε είναι Android είτε iOS.

Step 2

Find the Password from the administrator

To log in to the virtual room you have been invited to, the administrator will have sent you a link or password. Note the "key" code. If they did not give you the key code, and only gave you the link, the key is the numbers at the end of the link as shown above.

Step 3

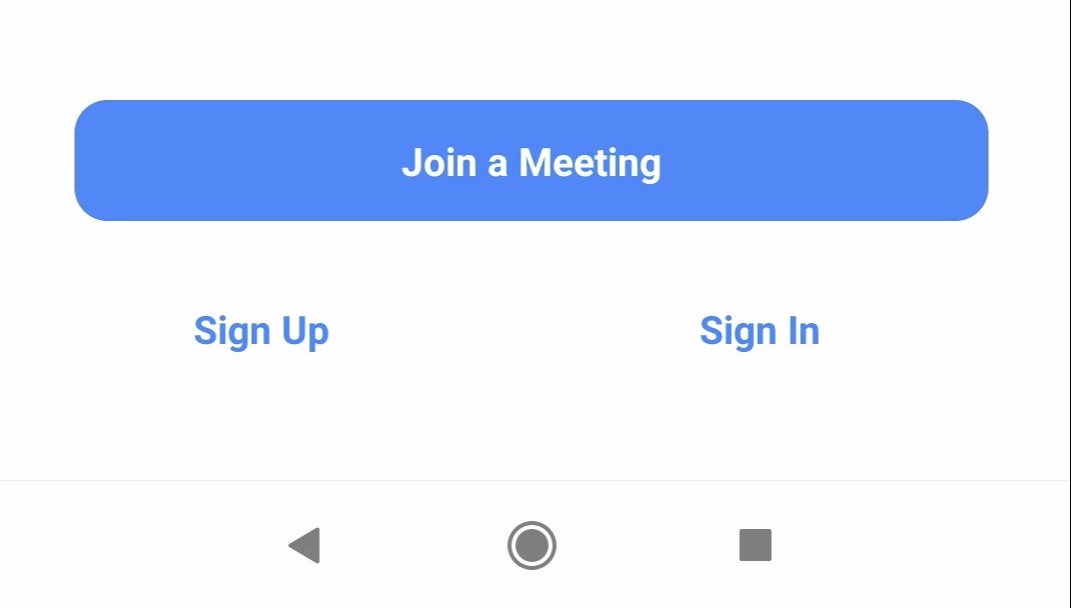
Open your application and click Join Meeting.

Clicking Join Meeting will give you the opportunity to log in to the room with the code you just entered.

Step 4

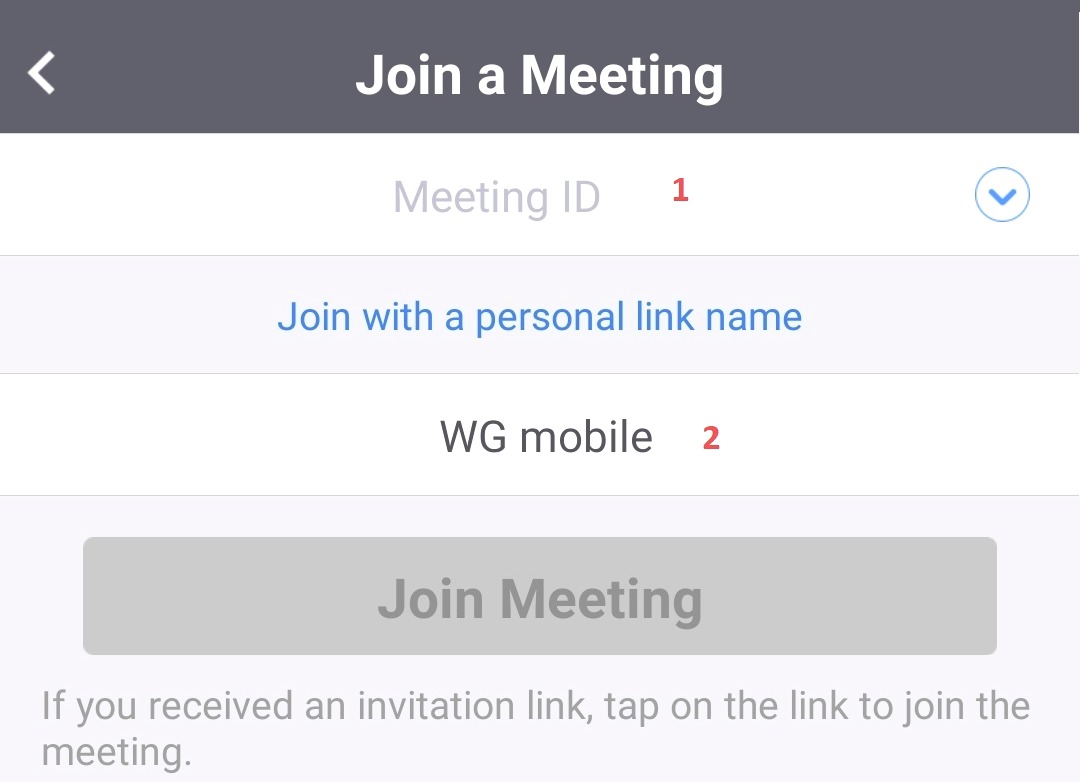
Fill in the details

On the next screen, fill in the code you have kept (1) and also enter a distinctive name that will be recognized by the other participants in the meeting (2). Finally click Join Meeting to log in.

Step 5

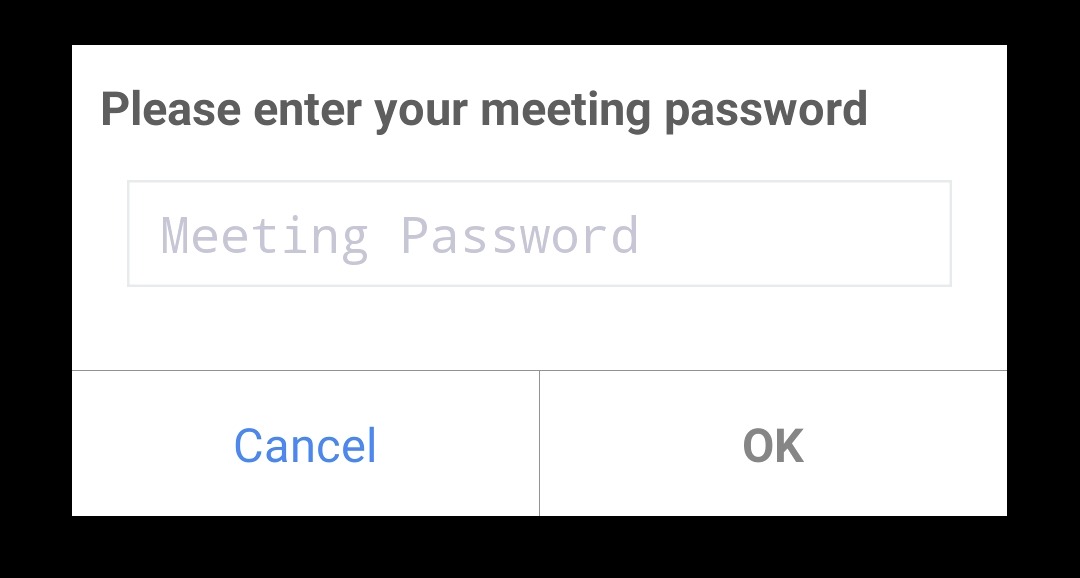
Enter the password given to you by its host.

For security reasons, you will need to enter the security code provided by the creator and host of the meeting / presentation before you can log in.

Step 6

Turn on the audio and camera.

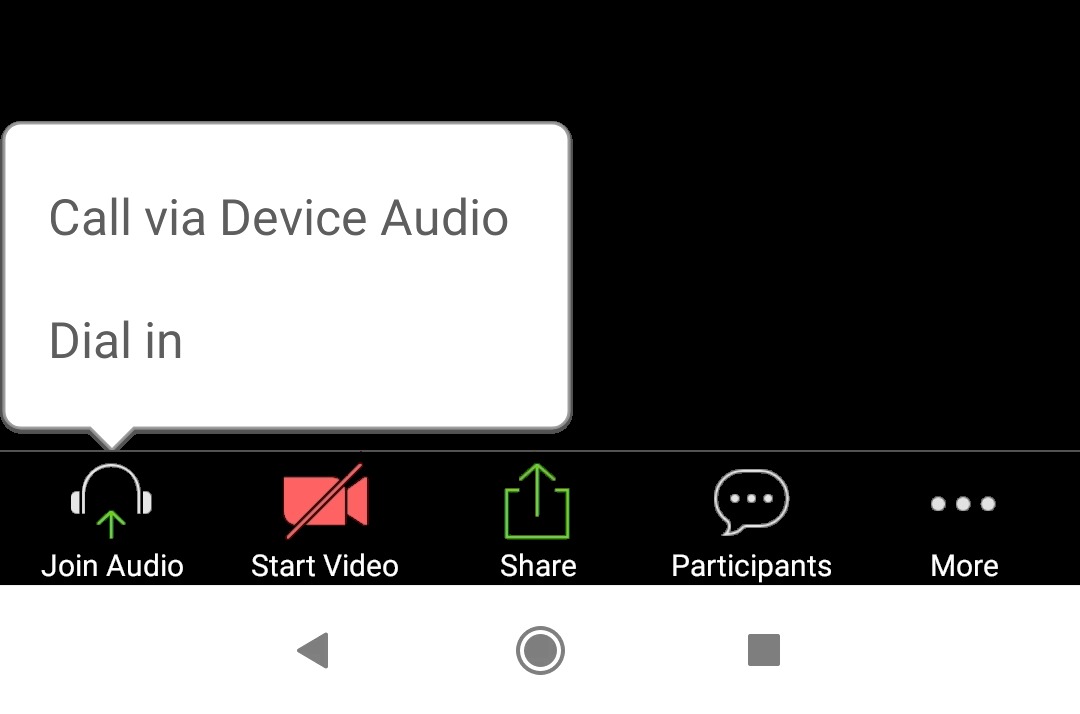
After connecting and it will show you this image, press "Join Audio" at the bottom left to connect your microphone and "Start Video" to connect your camera.

I can not hear you, you do not hear them and the camera does not work?

Frequent problems

It is usually due to poor network quality. Rare cases due to computer. Try to connect closer to the router if you are connecting wirelessly, or connect your computer with a cable for better speed.

This is usually because you did not turn on the right microphone and speakers. Detailed instructions follow below.

Exit and re-enter the teleconference. Most of the time this problem is fixed.

You must turn on the sound when connecting from your mobile phone. When you connect from your mobile, at the bottom left of the screen you will find an icon that says "Join Audio". Press to turn on your microphone. See the details in the mobile connection section.

You must turn on the camera when connecting from your mobile phone. When you connect from your mobile, at the bottom left of the screen you will find an icon that says "Start Video". Press to activate your camera. See the details in the mobile connection section.

For security reasons the company added an additional security measure for entering the meeting rooms and so to connect from the computer you must have a renewed link for the room and for the connection via mobile you must have a security code to be able to to connect successfully.

Manage video and audio problems

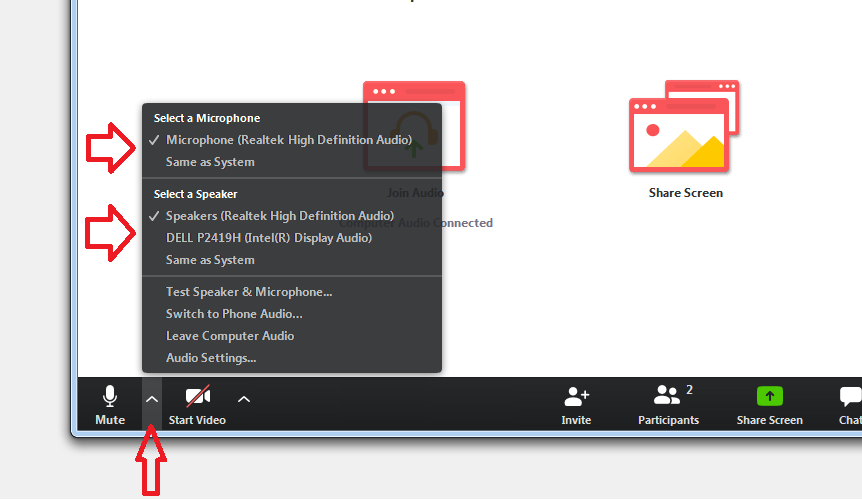
It is possible that when someone connects to the basic "Join with Computer Audio" settings they will not be able to hear the conversation or be listened to. This is because the computer may have many microphones connected to it (eg built-in laptop microphone and camera microphone) or different speakers also connected (built-in speakers, external speakers) and the application does not know which one to use.
In the lower left part of the Zoom window you will find the arrow next to the microphone. If you press it there it will have the options for headphones and microphones. Choose another option if you see that something is not working.
The above instructions are intended to help you install and connect more easily to this teleconferencing program. It is not and is not intended to be a complete product presentation of the product. We hope they help you.

FREE ASynchronous EDUCATION PLATFORM

Sharing the challenges faced by those involved in education and seminars at this time, we offer a free asynchronous education platform for the entire crisis period. Request access.

WebsiteGreece Logo

Get a great presence and turn your visitors into customers.

Contact

Aitolikou 49, Piraeus, 18545
Map

+30 211 7253448
+30 6908885550

info @ websitegreece.com